The dream of energy independence is fascinating, but it often seems like a complex and expensive goal. What if I told you that you could start producing and using your own clean energy with a project that is simple, accessible, and incredibly useful? In this article, we’ll explore how to build a 12V solar power system starting with just three fundamental components. It’s the perfect starting point for powering your DIY projects, lighting a remote area, or simply learning the basics of renewable energy.
The Core Components: The Energy Trio
At the heart of our system are three elements that work in perfect synergy.
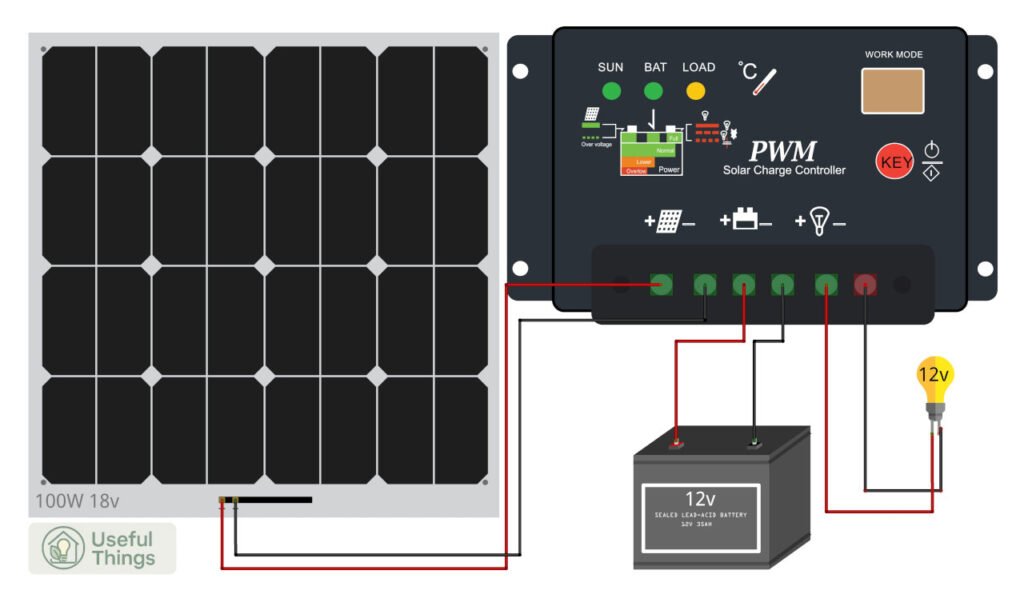
- The Solar Panel (100W, 18V): The Energy Collector This is the engine of our setup. On a sunny day, a 100W panel can generate enough energy to charge a medium-sized battery. The 18V rating (typical for “12V” panels) is necessary to ensure the voltage remains higher than the battery’s, thus allowing for effective charging even when the panel is not in optimal sunlight.
- The Charge Controller (12V): The Brains of the System This device is crucial for the health and longevity of your battery. Its job is to manage the flow of energy from the panel to the battery, acting as an intelligent gatekeeper. It prevents overcharging when the battery is full and disconnects the load to prevent over-discharging when you draw power—two conditions that would irreparably damage the battery.
- The Lead-Acid Battery (12V): The Energy Reservoir For this type of stationary project, a lead-acid battery is an excellent choice: it’s robust, inexpensive, and handles the charging cycles managed by a good controller very well. Its capacity (measured in Amp-hours, Ah) will determine how long you can power your devices when the sun isn’t shining.
The Potential: What Can You Actually Power?
Once assembled, this system opens up a world of possibilities. It’s not designed to power an entire house, but its potential for 12V Direct Current (DC) applications is enormous:
- Off-Grid Lighting: Power 12V LED strips or bulbs to light up a garage, greenhouse, shed, or mountain cabin.
- Device Charging: Connect a car cigarette lighter adapter, and you can charge smartphones, tablets, and other USB devices anywhere.
- Hobbies and DIY Projects: Provide a stable and continuous power supply for projects based on Arduino, Raspberry Pi, weather stations, or ham radio rigs.
- Small DC Appliances: Run small pumps for garden irrigation, cooling fans, or small camping refrigerators.
- Security: Power a 12V surveillance camera or a small alarm system in an area not reached by the power grid.
Here some material to start 18V 100W Solar panel - Voltage regulator
The Realization: From Idea to Energy in a Few Steps
The true beauty of this system lies in its simplicity of assembly, making it a perfect project for beginners. The connection logic is intuitive and safe, as long as you follow the correct order:
- Connect the Battery: Always connect the charge controller to the battery terminals first. This allows the controller to auto-configure to the correct system voltage (12V).
- Connect the Solar Panel: Next, connect the solar panel’s wires to the “PV” (Photovoltaic) inputs on the controller. If there’s light, you should see an indicator showing that charging has begun.
- Connect the Load: Finally, connect your 12V devices to the “LOAD” outputs on the controller. This output is protected by the controller itself against over-discharging the battery.
With these three simple steps, you have transformed sunlight into a practical and usable energy source.
Expanding the Potential: Adding a 220V Inverter
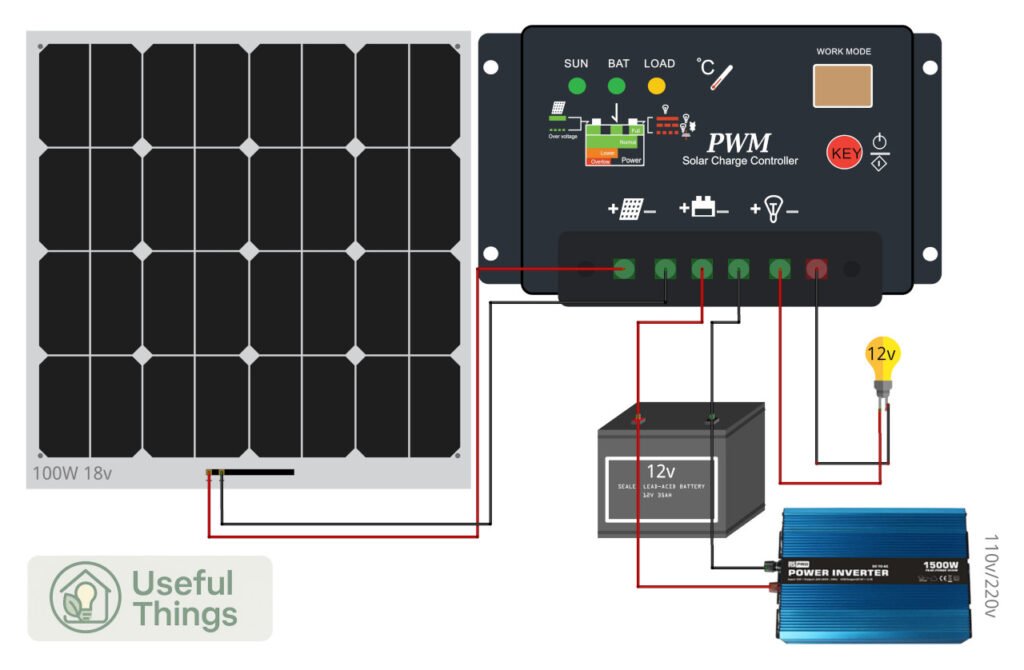
Our 12V system is incredibly versatile, but what if we want to power devices that we normally plug into a wall socket, like a laptop, a small appliance, or a specific charger? This is where an inverter comes in. It’s an additional component that converts the 12V Direct Current (DC) from the battery into the 220V Alternating Current (AC) of the household grid. However, it’s crucial to choose the right type, as there are two main typologies:
- Modified Sine Wave Inverters: These are the less expensive option and generate a “stepped,” blocky wave that approximates the grid’s waveform. They work fine for simple loads like incandescent bulbs or tools with brushed motors, but they can cause issues, buzzing noises, or even damage sensitive electronics like computers, modern TVs, audio equipment, or induction motors.
- Pure Sine Wave Inverters: While more expensive, these produce a clean, perfect electrical wave that is identical to (or sometimes even better than) household power. This is the recommended choice for maximum compatibility and safety, as it guarantees the proper functioning of any device, protecting delicate equipment and ensuring efficiency. For a reliable system, a pure sine wave inverter is always the best investment.
Conclusion: Your First Step Towards Autonomy
Building a 12V solar system is much more than just a technical project: it’s an educational experience that demonstrates how accessible it is to harness renewable energy. With a minimal investment and a few hours of work, you can create a reliable power source for your hobbies, ensure you have power for small necessities during a blackout, or simply enjoy the satisfaction of having built something useful and sustainable. This system is not an endpoint, but a solid starting point—scalable and adaptable for future energy adventures. Fonti


Leave a Reply